Article
Compile Ruby apps with Tebako
Package and distribute apps built in Ruby to Windows, macOS, and Linux

When I started building Terminalwire, I decided to build it out using Ruby since that’s where I’m most productive and it keeps getting better and faster with every release. I also knew that put me on a path where I’d have to confront the reality that Ruby is notoriously difficult to distribute to users who don’t have Ruby dependencies installed on their machines, which I wrote about last week.
Fortunately, I found a project called Tebako, which can compile Ruby applications into concise binaries that run on Windows, macOS, and Linux.
Let’s take a look at how Tebako works in practice for the Terminalwire Client to help you get a better idea of how you might start using it in your Ruby projects.
The terminalwire-exec binary
Terminalwire is a client-server application that streams terminal commands users enter into their terminal, like tinyzap link create, to a server running the command-line app. The server receives the tokens ["tinyzap", "link", "create"] from the client via WebSockets and processes the command, streaming standard I/O, browser launch commands, and more between the command-line thin client and the command-line parser running on the server.
In our example, the tinyzap binary isn’t the Tebako binary itself. If you open one of these binaries via cat $(which tinyzap), you’d see something that looks like this:
#!/usr/bin/env terminalwire-exec
url: "wss://tinyzap.com/terminal"
The binary terminalwire-exec is the Ruby app I packaged up using Tebako! The Terminalwire executables forward the tinyzap link create command through the terminalwire-exec Tebako binary to the wss://tinyzap.com/terminal endpoint. It turns out it’s not magic; it’s just a different approach to building command-line apps for web apps that I summarize to Rails developers as “Hotwired, but for command-line apps.”
In this article, I’m going to focus on how I used Tebako to package up the terminalwire-exec thin client I implemented in Ruby and distribute it to macOS and Linux users who don’t have Ruby installed on their machines.
Compiling a Ruby app with Tebako
Building a Ruby application with Tebako is as straightforward as running the tebako build command.
tebako press \
--entry-point hello.rb \ # Script you want to run
--root . \ # Root of your project folder
--Ruby 3.4.2 \ # Version of Ruby you want to package
--output howdy \ # Name of the binary file
The way it works is pretty cool–application files are packaged up using DwarFS, which is a read-only file system Tebako compiles into the Ruby binary and loads from memory when it’s executed.
Let’s go back to Ruby. In the example above, you selected Ruby 3.4.2, which is the most current version of Ruby at the time of writing. Tebako starts compiling Ruby like any compiler would, but then it patches the part of Ruby that starts running scripts with DwarFS and the entry-point file from the command line above.
When it’s all said and done, you get a single Ruby binary that runs the hello.rb file you specified from DwarFS when users run howdy.
15 megabyte binaries
The most pleasant surprise I encountered with Tebako is the size of the binaries. terminalwire-exec ended up being roughly 14-15 megabytes.
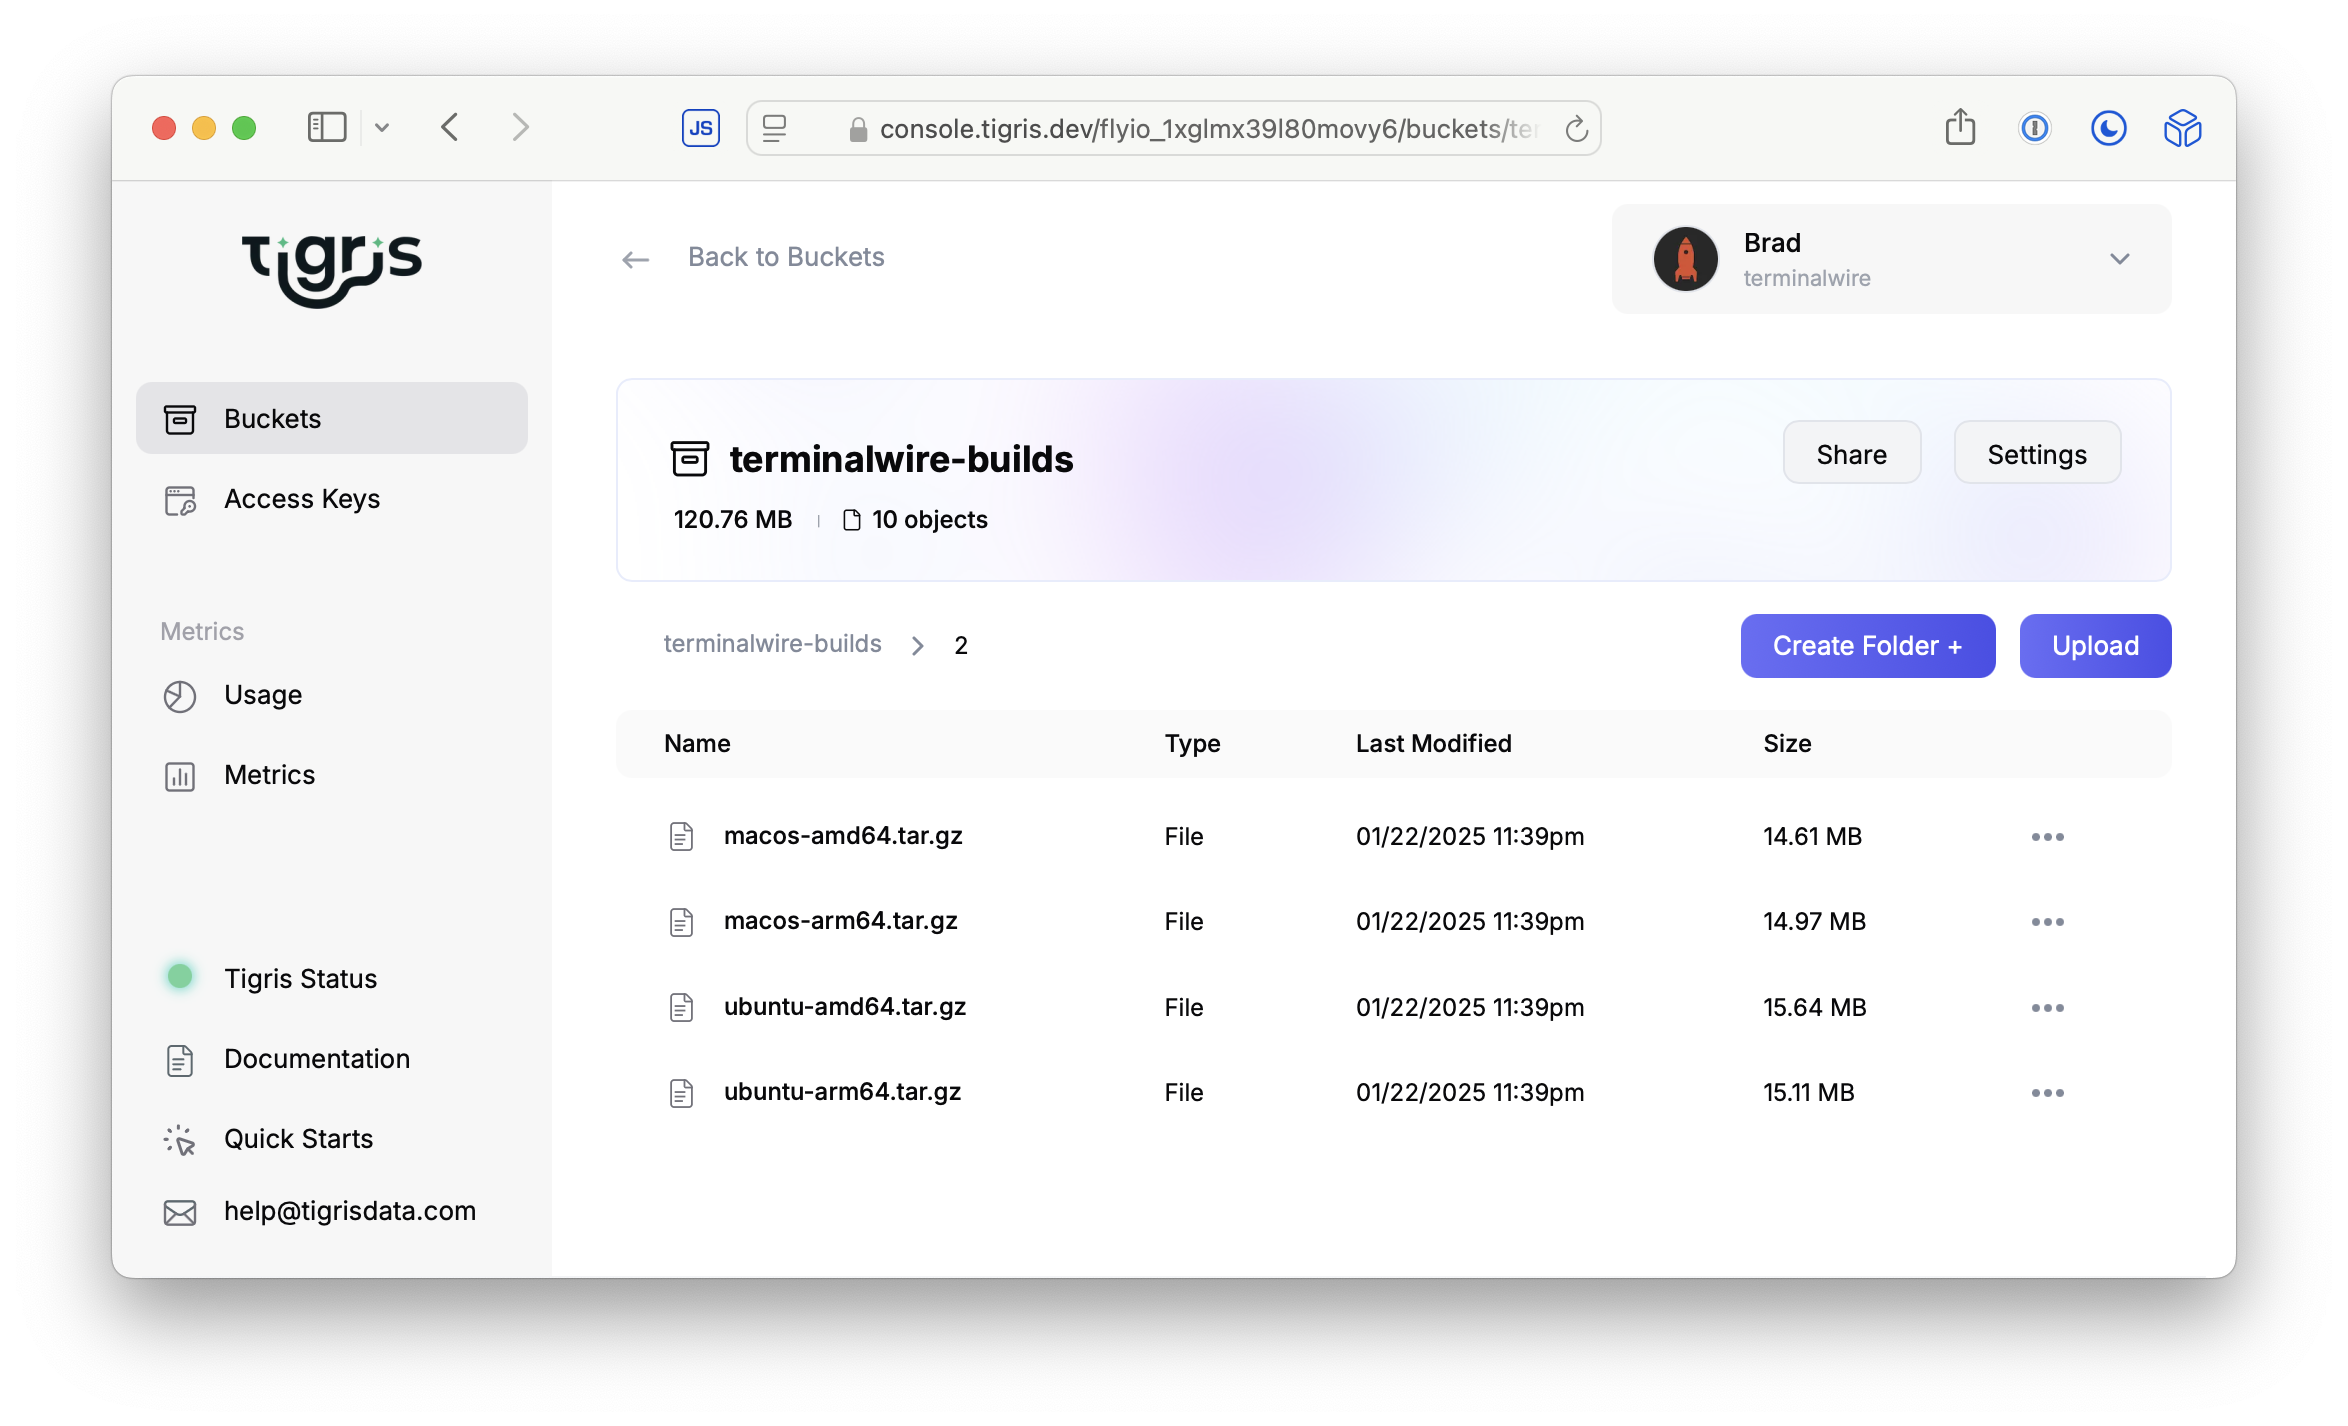
Just to give you an idea of how that stacks up against some other popular command-line tools, Heroku’s Homebrew heroku app weighs in at 452.3 MB and GitHub’s gh app is 46.3 MB.
Docker containers
For those who don’t want to install the Ruby dependencies on their workstations for Tebako builds, there are a few Dockerfiles Tebako maintains that are designed to run locally on your workstations and in CI environments.
For Terminalwire, I didn’t end up using these containers because it didn’t fit into my CI workflow. More on that later.
Cross-platform compilations
Building cross-platform binaries is a bit more challenging with Tebako than languages like Go. The main challenge is you have to compile the Tebako package on the operating system and architecture you’re targeting.
If the platforms GitHub Actions supports are enough to cover the platforms you’re targeting, that’s pretty easy. At the time of this writing GitHub Actions supports arm64 macOS, x86_64 Linux, and arm64 Linux out of the box, but for Terminalwire I needed to support x86_64 macOS builds.
To get that working, I pulled my 2016 MacBook Pro out of the closet, turned it on, installed macOS 13, set up a development environment, and got Tebako building binaries for that platform. It took a bit of work getting that environment set up, but once it was up and running it was quite easy to compile Tebako x86_64 macOS builds.
DwarFS, paths, and $PROGRAM_NAME
One thing to keep in mind when you start using Tebako is how paths work. Remember how Ruby files are compiled into the binary via DwarFS? Those files live in memory compiled into the Ruby applications. That means if your Ruby app needs to know the location of a file within itself, you’ll get back paths prefaced with /__tebako_memfs__.
./howdy
irb(main):001> __FILE__
=> "/__tebako_memfs__/bin/hello.rb"
I’m pretty sure this is a problem unique to the Terminalwire client, but it needs to know the name of the running binary to send to the Terminalwire server so it can be used to process a command. To my surprise, $PROGRAM_NAME gave me the path of the entry-point file:
./howdy
irb(main):001> $PROGRAM_NAME
=> "/__tebako_memfs__/bin/hello.rb"
Instead of the expected name of the binary.
./howdy
irb(main):001> $PROGRAM_NAME
=> "howdy"
The good news is I opened an issue on their repo and there’s a few opinions flying around about how that should behave and be implemented.
Packaging scenarios
One thing I’m not a huge fan of for Tebako are the packaging scenarios. The tebako press command will build projects differently depending on the entrypoint and files passed into it that I think does “too much magic”.
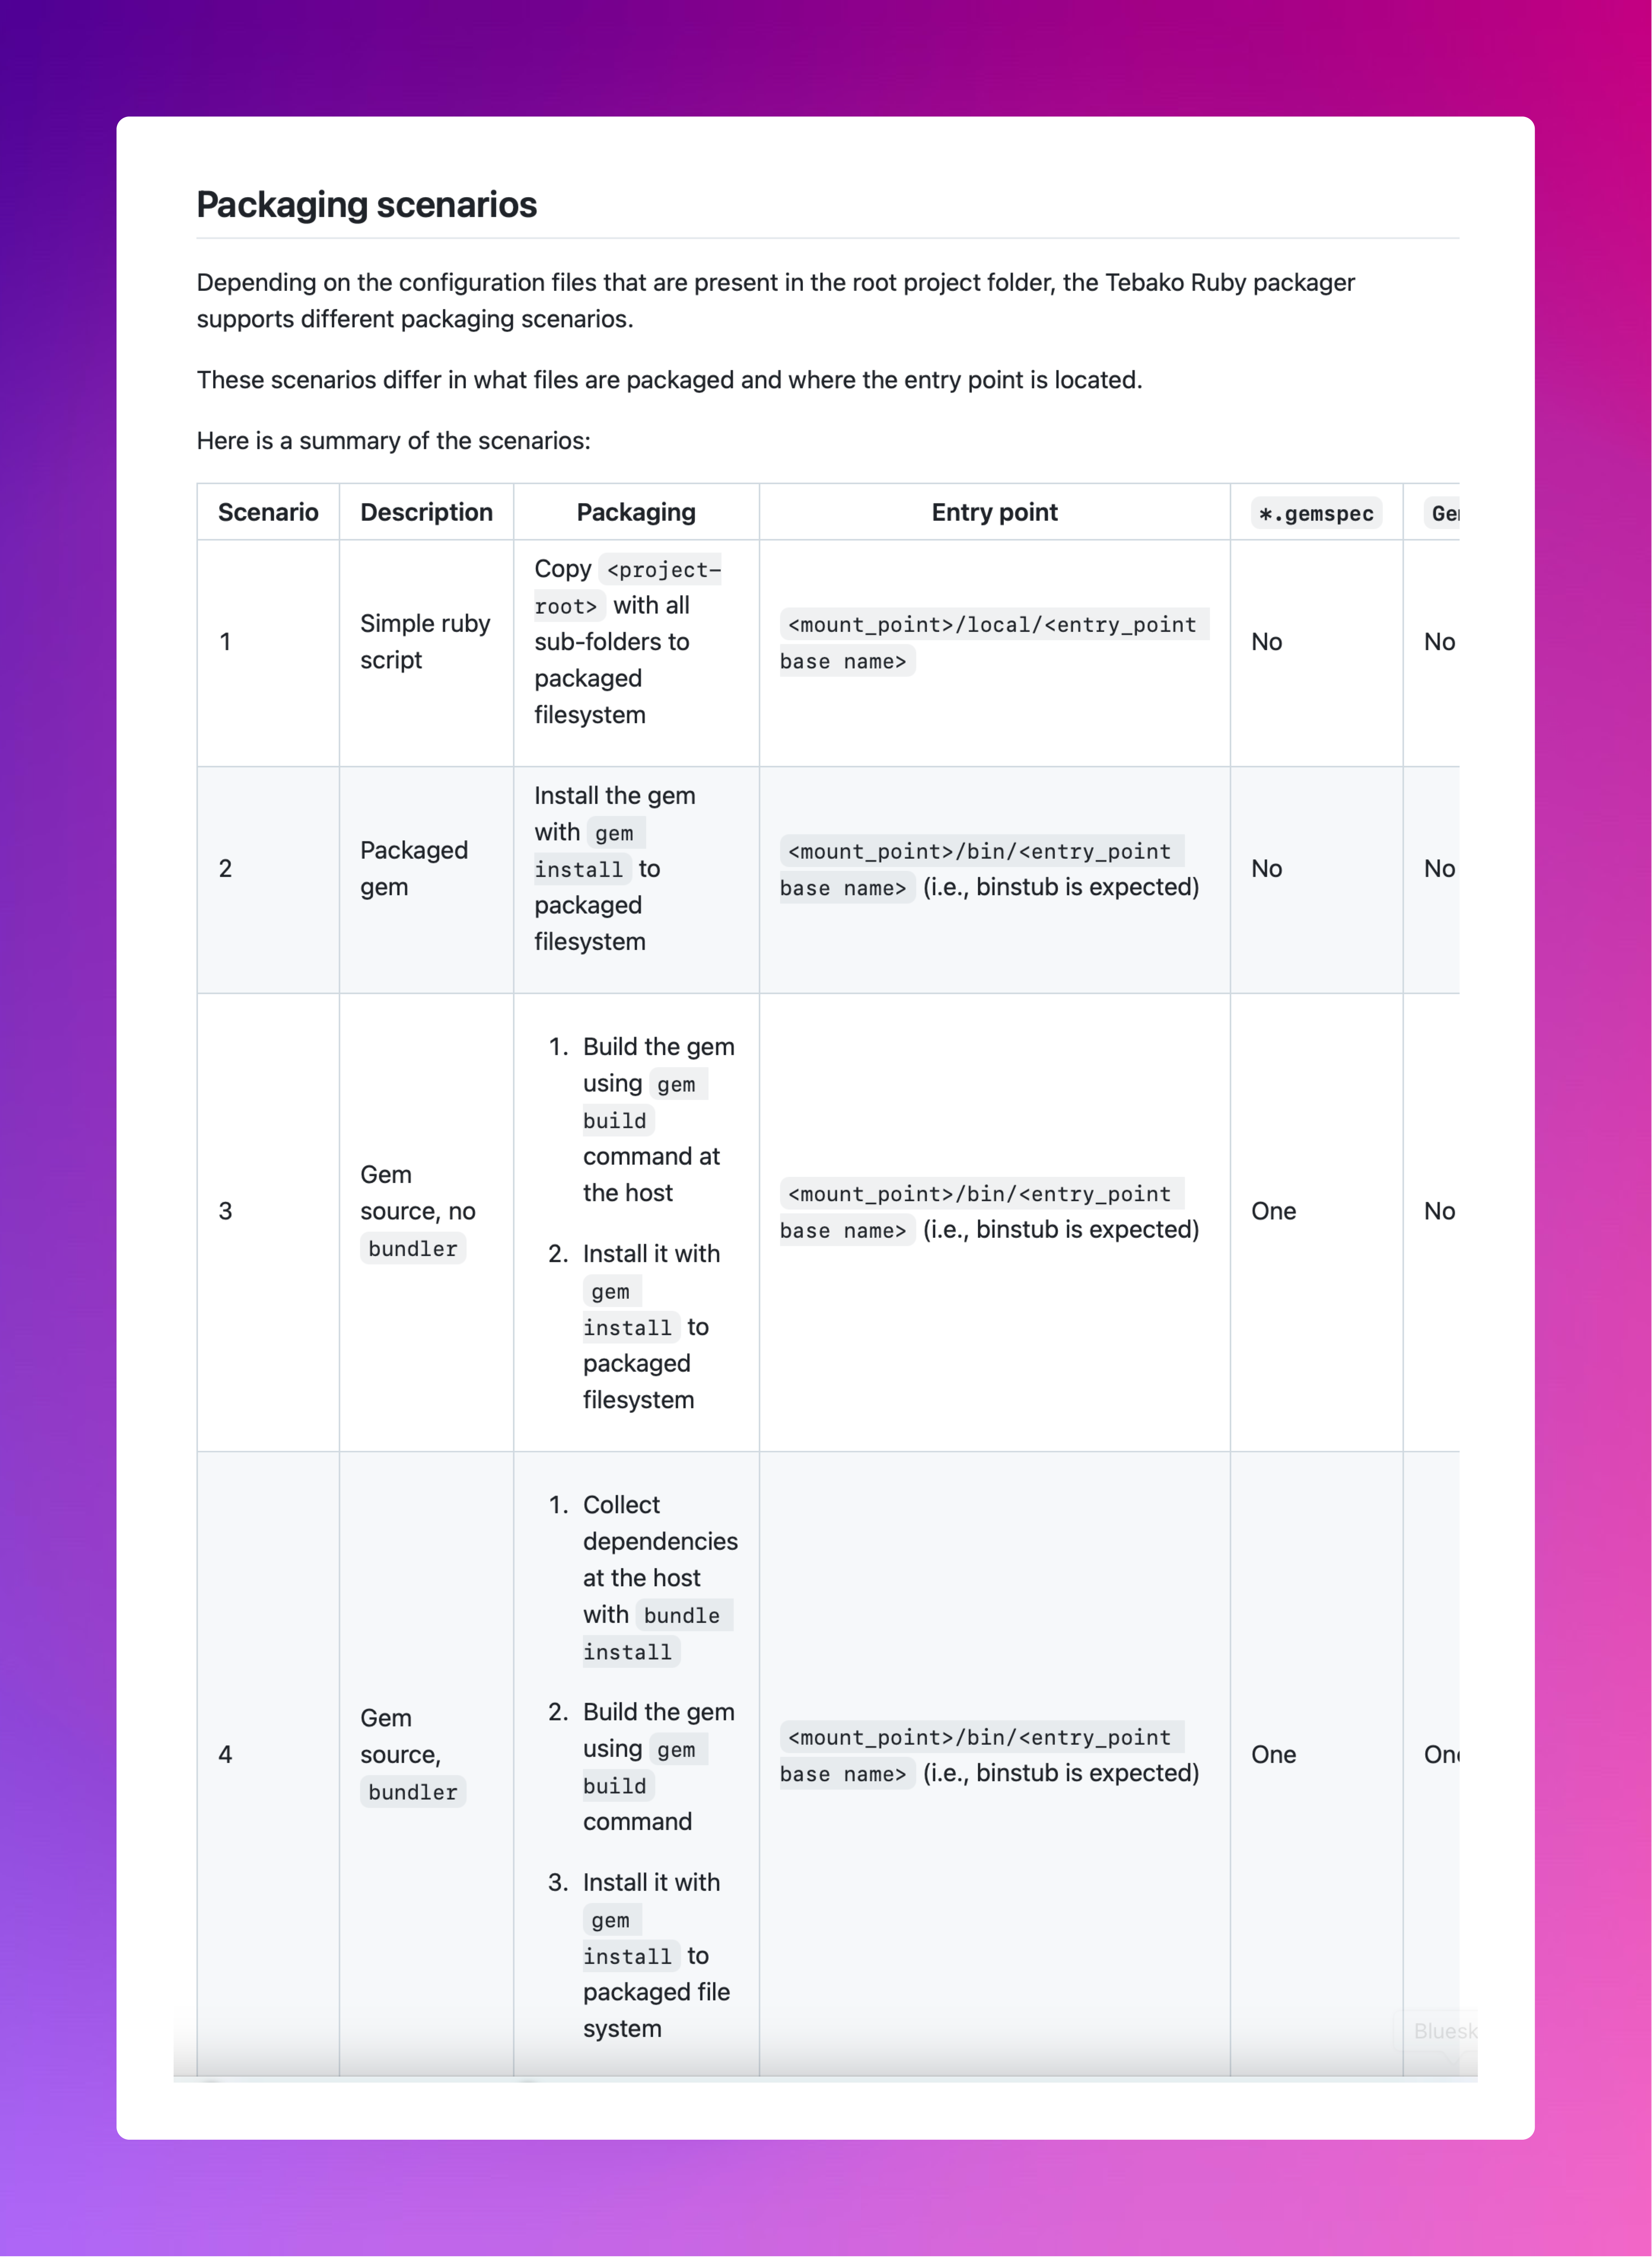
Since Terminalwire is a monorepo with multiple gems, it took me a while to figure out which directory I had to pass into tebako press to get a binary out the other side. My CI pipeline currently uses the “packaged gem” scenario, which means I need to cut releases of my gem to RubyGems before building a Tebako executable. This complicates my pre-release CI workflow since I have to release *.*.*.alpha* gems, but it does get a Tebako build out the door.
The community
When I start seriously considering the usage of open source in my projects, I edit the README in areas that I think could be clearer or more helpful for the next person that comes along, then I open a PR to see what it’s like getting a change merged into the repo.
As I started running into some of the issues I discussed above, I opened issues in GitHub with reproduction steps and various contributors were helpful in recreating the problem or understanding that it’s a “works on my machine” type of problem.
Overall, I’ve had positive experiences working with the Tebako community.
Conclusion
Overall I’m very pleased with Tebako. The community is responsive and pragmatic, the project has a vision, and it gives me reasonably sized binaries that I can run on many different platforms.
The 15 megabyte binary file size for terminalwire-exec exceeded my expectations and it runs well on many different platforms.
Setting up the continuous integration workflow for my requirements was a bit challenging and required more manual work, but as I get more iterations in with my pipeline and work with the project, I’m confident I’ll end up with a highly automated and repeatable build pipeline.
I hope the Ruby community takes notice and starts doing the forbidden thing you’re not supposed to do–distribute Ruby applications to end users. If more people do it then I’m confident Tebako will only get better.